My friends introduced me to infinity rings a while and they went on and on about how much they loved them and I fell in love with them as well. So I decided to make them (and myself) some around Christmastime. And then, a few days ago, I realised that it fit perfectly in my DIY Wire Ring series, and it's one of those friends's birthday today - happy birthday Avya! - I figured that it was appropriate.
P. S. The blog url is going to change to stylegeneris.blogspot.com on Monday, September 9th. If you want to learn more about the change, check out my blog post here.
P. S. The blog url is going to change to stylegeneris.blogspot.com on Monday, September 9th. If you want to learn more about the change, check out my blog post here.
WHAT YOU'LL NEED
- two 2 inch pieces of 20 gauge wire, once again, I got mine from Michael's with their weekly 40% off coupon. Also, my ring size is a 6, so if yours is bigger, I'd suggest that you cut off some more. Cut off some more if you're a beginner/this is your first time (or one of your first) making wire rings.
- wire cutters
- regular old pliers
- a marker that mimics somewhat accurately your finger size (emphasis on somewhat)
Take your pliers and curve the end of the wire towards a point on the wire. Make sure that it touches as close as possible to the wire (mine get pushed in more later on). Do the same thing on the other side and make that first curve. I used my finger nail, but if you're a bit more unsure, use some pliers to make that bend.
Using that bend, make it a bit more defined and curve the end of the wire (or around that general area) towards the other end of the sign (the one who already finished).

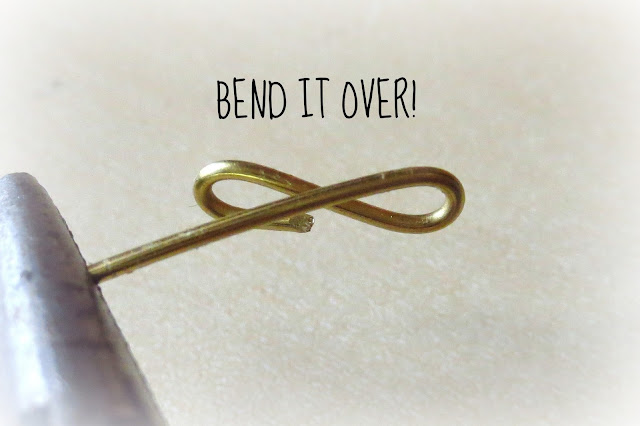
Take that end of the wire, the end that doesn't already have the finished half of the sign, and flip it over, crossing it to the other side as you can see in the photo.
To finish off your sign, cut the wire to make the sign look as seamless as possible and truly like an infinity sign. You're probably thinking that it doesn't really, but that's the best you can do, at least by DIY-ing it.

Now, on to the band. Wrap your second piece of wire around your marker. Try to get it hugging as close to the marker as possible. Then put it on your finger and push it together a bit more so that it fits better on your finger. Cut off a bit of the excess, but not too much. It should almost be able to form a full circle.
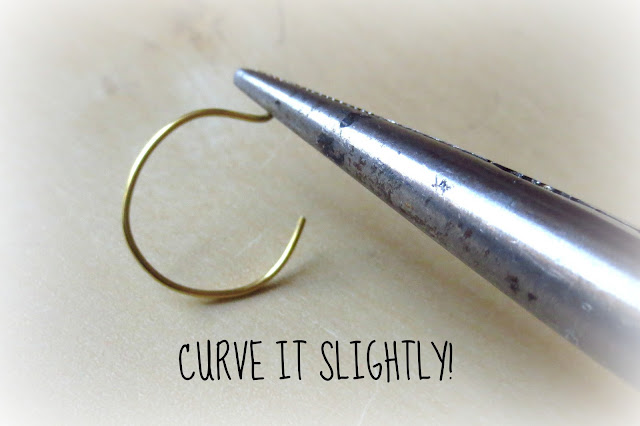
Curve both ends slightly. This is to hook the infinity sign on, so you should measure it out (like with the photo down below) to make sure that it'll fit on your finger afterwards.
Slip the infinity sign on the band and...
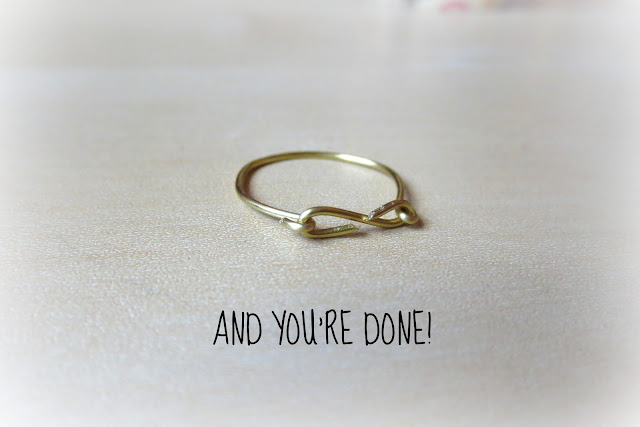
If everything turns out alright, you should have a bit of excess wire on the other side of the band, enough for you to repeat the previous band-curving steps. Do that and slip that end of the band through the other end of the sign. Clamp it down like before.
There you have it! This is how your ring should look like and I hope that it in fact does look like that. I hope that this helped you somehow and that you'll try this out. Next week will be my last DIY Wire Ring tutorial and I'll be doing one on skull rings, so be excited (if you're into that stuff).
Just to finish things off, I just wanted, again, to wish you a happy birthday Avya! You're sweet, kind, and just one of the most amazing people that I've ever meant in my life. I'm so lucky to have you as my friend and though we won't be going to the same school next year, I'm so happy that we've shared the past two years together. Have an amazing day, Avya!
Thanks for reading!
- J


Loved this Juliana! I may just have to give it a go :)
ReplyDeleteThank you! I really hope that you end up trying it out. :)
Delete- Juliana
Love this DIY. Amazing. It looks soo pretty and cute! Good job Juliana :)
ReplyDeletexoxo
http://tfd-thefashiondistrict.blogspot.com/
Thank you Oumayma! I hope that you'll try it out yourself. :)
Delete- Juliana
Omg, I love this, I'm obsessed with the TV show revenge at the mo, and I can't find the infinity ring anywhere. So I really like this DIY idea. I'm gonna make it for sure.
ReplyDeleteAssiya
http://beautybywire.blogspot.com/
Thank you so much, Assiya! Now, I'm actually going to try to recreate the Revenge double infinity ring and I'll definitely write a post about it. Thank you for stopping by and following!
Delete- Juliana
wow it's really pretty, you're talented :)
ReplyDeleteThank you, Chi Khanh! :)
Delete- Juliana
you're welcome :D honestly i'm so obsessed with these cute accessories like bow ring,mustache ring & earrings,infinity ring,...etc.I really want to make ones but seems i'm too busy to do that :(
DeleteI'll make you some and bring them when I come to stay with you this summer. :) I'll be sure to bring my wire just in case it doesn't fit.
Delete- Juliana
i'd love to <3 thanks you so much :3
DeleteNo problem. :) Happy to help.
Delete- Juliana
I just made one of these in about 10 minutes for my daughter for Christmas! I used 18ga. Silver Filled wire. I wrapped the band so the loops were on the inside, but besides that, no changes. Thanks for sharing!
ReplyDeleteAww, Mary Anne, you have no idea how happy I am after reading that. :) I hope that she'll love her Christmas gift. It's hearing little stories like these that just make me day. Thank YOU for sharing. :D
Delete- Juliana
visit our website replica ysl bags view it high quality replica bags linked here buy replica bags online
ReplyDeletebest replica bags o04 w6z70q1s84 replica ysl handbags g66 j7b04r2t49 replica bags online s64 p3m86w9v37
ReplyDelete